


 Day by day, bit by bit, progress continues on our mobile home makeover. I wanted to share a quick little decorating project from one corner of our living room. This is a small corner to the left of the open entry to the kitchen. The before photo above is actually more of a kitchen shot, but the side of the oven is the corner where I did the project, so it gives a pretty good idea of what it looked like before...
And here's the same corner all painted and clean - a blank canvas ready for a bit of accessorizing. I got this cute little chair and ottoman as a freebie from my Mom who wasn't using it anymore (thanks Mom!!). It's a cutie, but it is so short I thought the corner needed a little height...
(click any image to see more details)
 ...so, I added a pair of chippy white louvered doors that I got at a garage sale ($5 for the pair), and I hinged them together and stood them in the corner...
(PS - Sorry once again for the dim lighting in the photos...it was not a very bright day, and the flash washes out the image too much...alas...)
 I have a shabby little touch in the works for this empty doorknob space...
 ...that involves one of these cute shabby glass knobs found in a pile if junk behind the well house on our property...
 ...but this part of the project will have to wait until I find my E-6000 glue buried in a box somewhere...
Anyway, I remembered that I had these cute little scalloped corner shelves ($2 each from a garage sale) that I knew I wanted to use somewhere...

...and it occurred to me that I could use them for this corner project along with the doors...
 Now that's just cute waiting to happen...
BTW, I don't suggest doing this at home, but I used push pins to attach the shelves to the doors...this does NOT make for the most stable shelves in the world but I was impatient and wanted to see how it would look. It holds pretty well actually, but not if you knock in to it. My sweet hubby assured me that he will re-engineer the shelves at some point in the very near future so as to pass safety standards... :o)

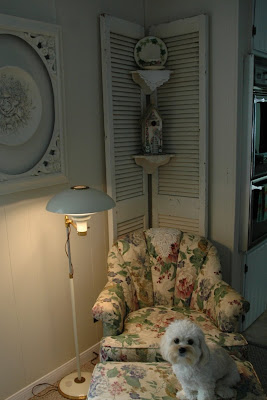
So here it is with the chair...but the shelves definitely need some goodies on them...

...these are not permanent...I just grabbed a few things that I had laying around...but you get the idea. It will be a great spot to add changing vignettes from season to season...


Hope your Sunday is blessed and your week is wonderful - full of joy and the sweetness of family and friends! Thanks for stopping by!


So here it is with the chair...but the shelves definitely need some goodies on them...

...these are not permanent...I just grabbed a few things that I had laying around...but you get the idea. It will be a great spot to add changing vignettes from season to season...

Before I show you the final after photo, I wanted you to see a close up of the creamy-white painted frame and plaster relief medallion that were already hanging to the left of the corner - you might recognize these from the walls of the shop where we displayed merchandise last summer...I loved "shopping" my own former shop wares to decorate my own home. This piece was already a favorite...I love how it looks on the painted paneling...a nice combination of tone-on-tone with different textures...
So, here's the little corner all finished...(I will be finding a cute replacement for the lamp at some point in the future, but for now it is functional, so it's staying). Well, I really like how this simple, inexpensive project cozied up this corner...I think Maddie agrees...

______________________________
One more tid-bit...here's a couple of sneak-peeks at the progress on my no-sew project...I expect to have it all completed today and will show photos in the next day or so...it's turning out even better than I had hoped!! Stick around for the big reveal...(don't worry...I promise it'll all make sense then :o)
Hope your Sunday is blessed and your week is wonderful - full of joy and the sweetness of family and friends! Thanks for stopping by!